Catalog Builder Checklist

Follow the Steps on this Checklist. Each  links to instructions.
links to instructions.You must be logged in to link this document to the instructions.
Click on the Question Mark beside the link to read instructions for that task
Your Catalog will remain editable for 5 days following the sale date or a maximum of 60 days.
Your Catalog will remain editable for 5 days following the sale date or a maximum of 60 days.
1. Getting Started
- Add the new sale Catalog
- Fully complete the basic sale information
- Choose the default pedigree type
- Use Edit Current Sale Information to choose more Options for the Catalog
- Customize the Internet Sale Preview
- Choose the color scheme to match your company or farm colors
- Upload the sale company logo, also adding sponsor logos at this time if desired
- Create Sessions
- Optional, but required if using two pedigree types in one catalog
- Sessions can be added any time during the job
- If sessions are used, a session code must be noted on each sale horse
- If Reference Sire pages are desired, add reference sires to a “Reference Sire Session”

2. Add sale horses and edit sale horse pages
- Add consignment information manually or
- Complete the Spreadsheet Template for a bulk consignment import
- If you are not an experienced and comfortable Excel user, hand-enter the horses.
- If the mailing labels feature or the Excel files generated by the Catalog Builder will be used for sale management purposes, include each consignor’s mailing and contact information for each horse.
- Pay special attention to the instructions for adding unnamed foals, clones and non-Quarter Horses.
- Post the Internet Sale Preview on your web site and/or Facebook, if you want to offer an early look to prospective buyers as the sale fills.
- • Copy & paste the Internet Sale Preview URL onto your web site and/or Facebook page
- • Or copy and paste the link into an email for your webmaster.
- • The Internet Preview shows only the family tree & notes (no sire and dam notes) until:
- • “Send Catalog Page to Sale Preview” is clicked on the Sale horse’s worksheet, or
- • “Send Final Pages to Internet” is clicked
- Inspect and edit each horse’s catalog page
- Click the Make-It-Fit button, or hand-edit each horse’s page to fit
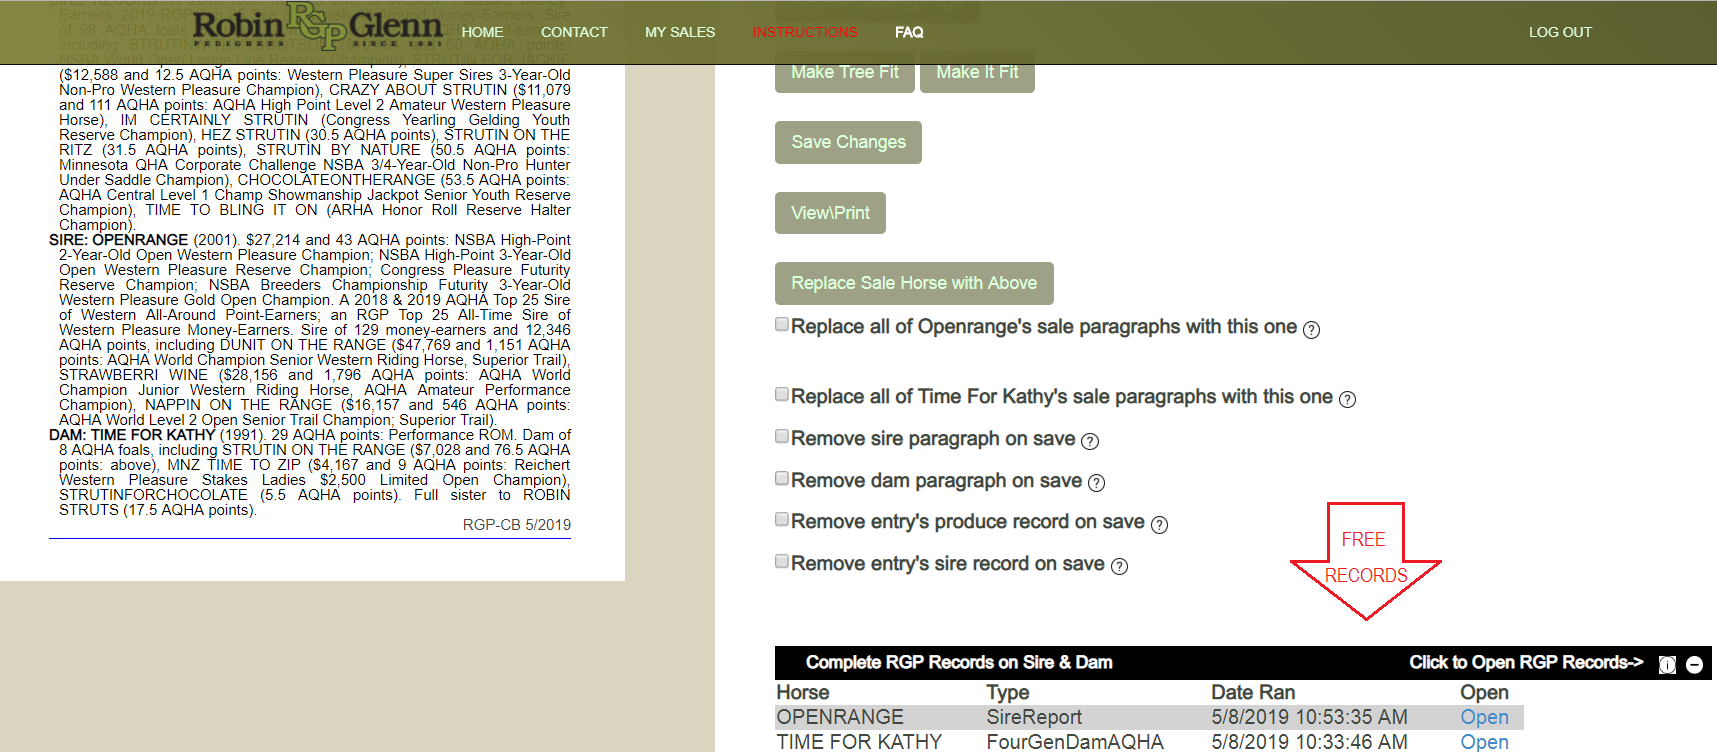
- Click on “Complete QDATA Records” to view more information about the sale horse
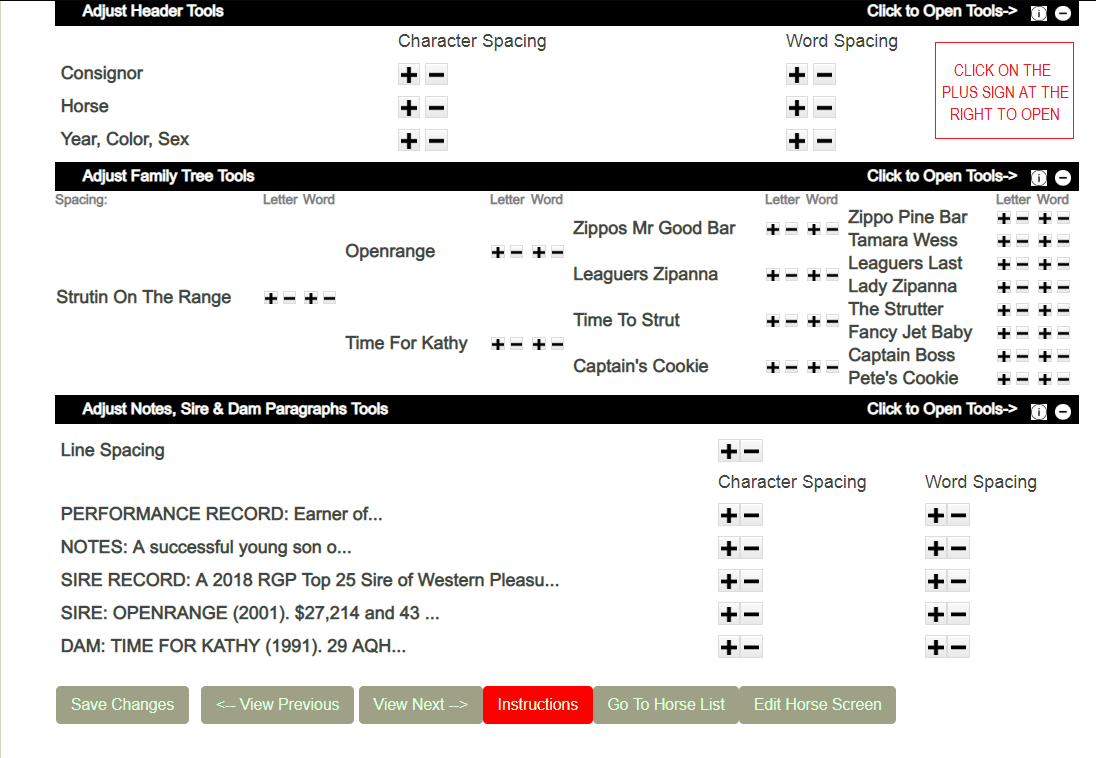
- Use the “Adjust” tools if needed
- When receiving photos, ensure they are of useable size and resolution
- Save the photo to your hard disk
- • File must be in flat JPG or PNG format (PDF files will not work)
- • Right Click on the photo, then click Details (Windows instructions)
- • Height, Width and Resolution will appear
- • Minimum of 150 DPI and 1,025 pixels wide (or tall) for printing.
- •A photo downloaded from social media will NOT WORK for printing.
- • 70 DPI and at least 1,000 pixels wide (or tall) for web use only
- •Social media photo downloads WILL work for the Internet Preview and the Catalog App.
- Upload the photos & videos individually to each horse, or
- Upload multiple photos at once by clicking on Actions/Import Consignments
- • Photo files must be named correctly
- Video links must be set individually
- Check the Proofing Report under Actions (“Issue” column)

- Print a Draft for proofing purposes (Under Actions)
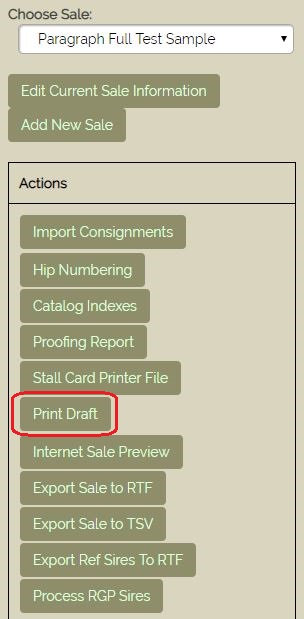
- • The draft is NOT the printer’s pages! (See #3).
- Inspect the Covering Sire Paragraph pages
- Add or edit the Non-Quarter Horse covering sire paragraphs
- Assign Hip Numbers after all consignments have been received
3. Finalize the Catalog(Make it Printer-Ready)
- Inspect the Consignor, Horse, Sire and Dam Indexes and the Covering Sire Paragraphs
- Inspect & save the photo gallery index
- Ctrl/P to Save as PDF (each file) to make the printer’s files
- Create the Covers and Non-Horse Pages: title page, schedule, terms, etc., separately.
- • Save to high-resolution PDF files
- • A local print shop can create these pages, if desired.
-
For Black-Type catalogs: Follow the Instructions at this link
For all other catalogs: Follow the step below - Choose your page layout & save
- If using the Newsprint format: add a header and/or footer, ads & text fillers
- Inspect and adjust the pictures
- Ctrl/P to Save as PDF to make the printer’s file
4. Make the printer's "Bible" documenting the desired page order, and send all PDF files to the Printer
- All four covers (front, inside front, back, inside back)
- Non-Horse Pages (Schedule, Terms, Ads, etc.)
- Catalog Builder Consignor, Horse, Sire and Dam Index Files
- Catalog Builder Covering Sire Paragraphs File
- Catalog Builder Sale Horse Pages File
- Catalog Builder Photo Gallery Pages File, if used
- Catalog Builder Reference Sire Pages, if used
5. Internet Sale Preview
- Click on “Send Final Pages to Internet”
- • This displays the entire catalog page for each horse.
- Save the complete printer’s PDF to your hard disk and upload to the Internet sale preview web page
- • Ask the printer for a web-resolution complete PDF
6. Send the Catalog to the QDATA Catalog App
- Put the Catalog on the App
- • The App will not accept catalogs with no hip numbers.
- Submit ads, if desired, to appear on the horse pages of the App
7. Stall Cards
- Produce the stall card PDF file for the printer and send the file to the printer
8. Reports for In-Office use
- Choose the file format & type of report (Excel is usually preferred)
- “Save as” to your computer’s hard disk to use in-office
- Create & print mailing labels if desired
9. After the Sale
- Upload the sale results to the Internet Sale Preview page